Using the Blog Editor
Edit sections, regenerate copy, manage the SEO, images, video, and internal-link panels, publish with status actions, and export your post.
Updated Sep 19, 2026
The editor is where you spend most of your time after a post is generated. It is built around sections rather than one long document, so you can rewrite, reorder, and regenerate individual parts without disturbing the rest.
The Section Editor
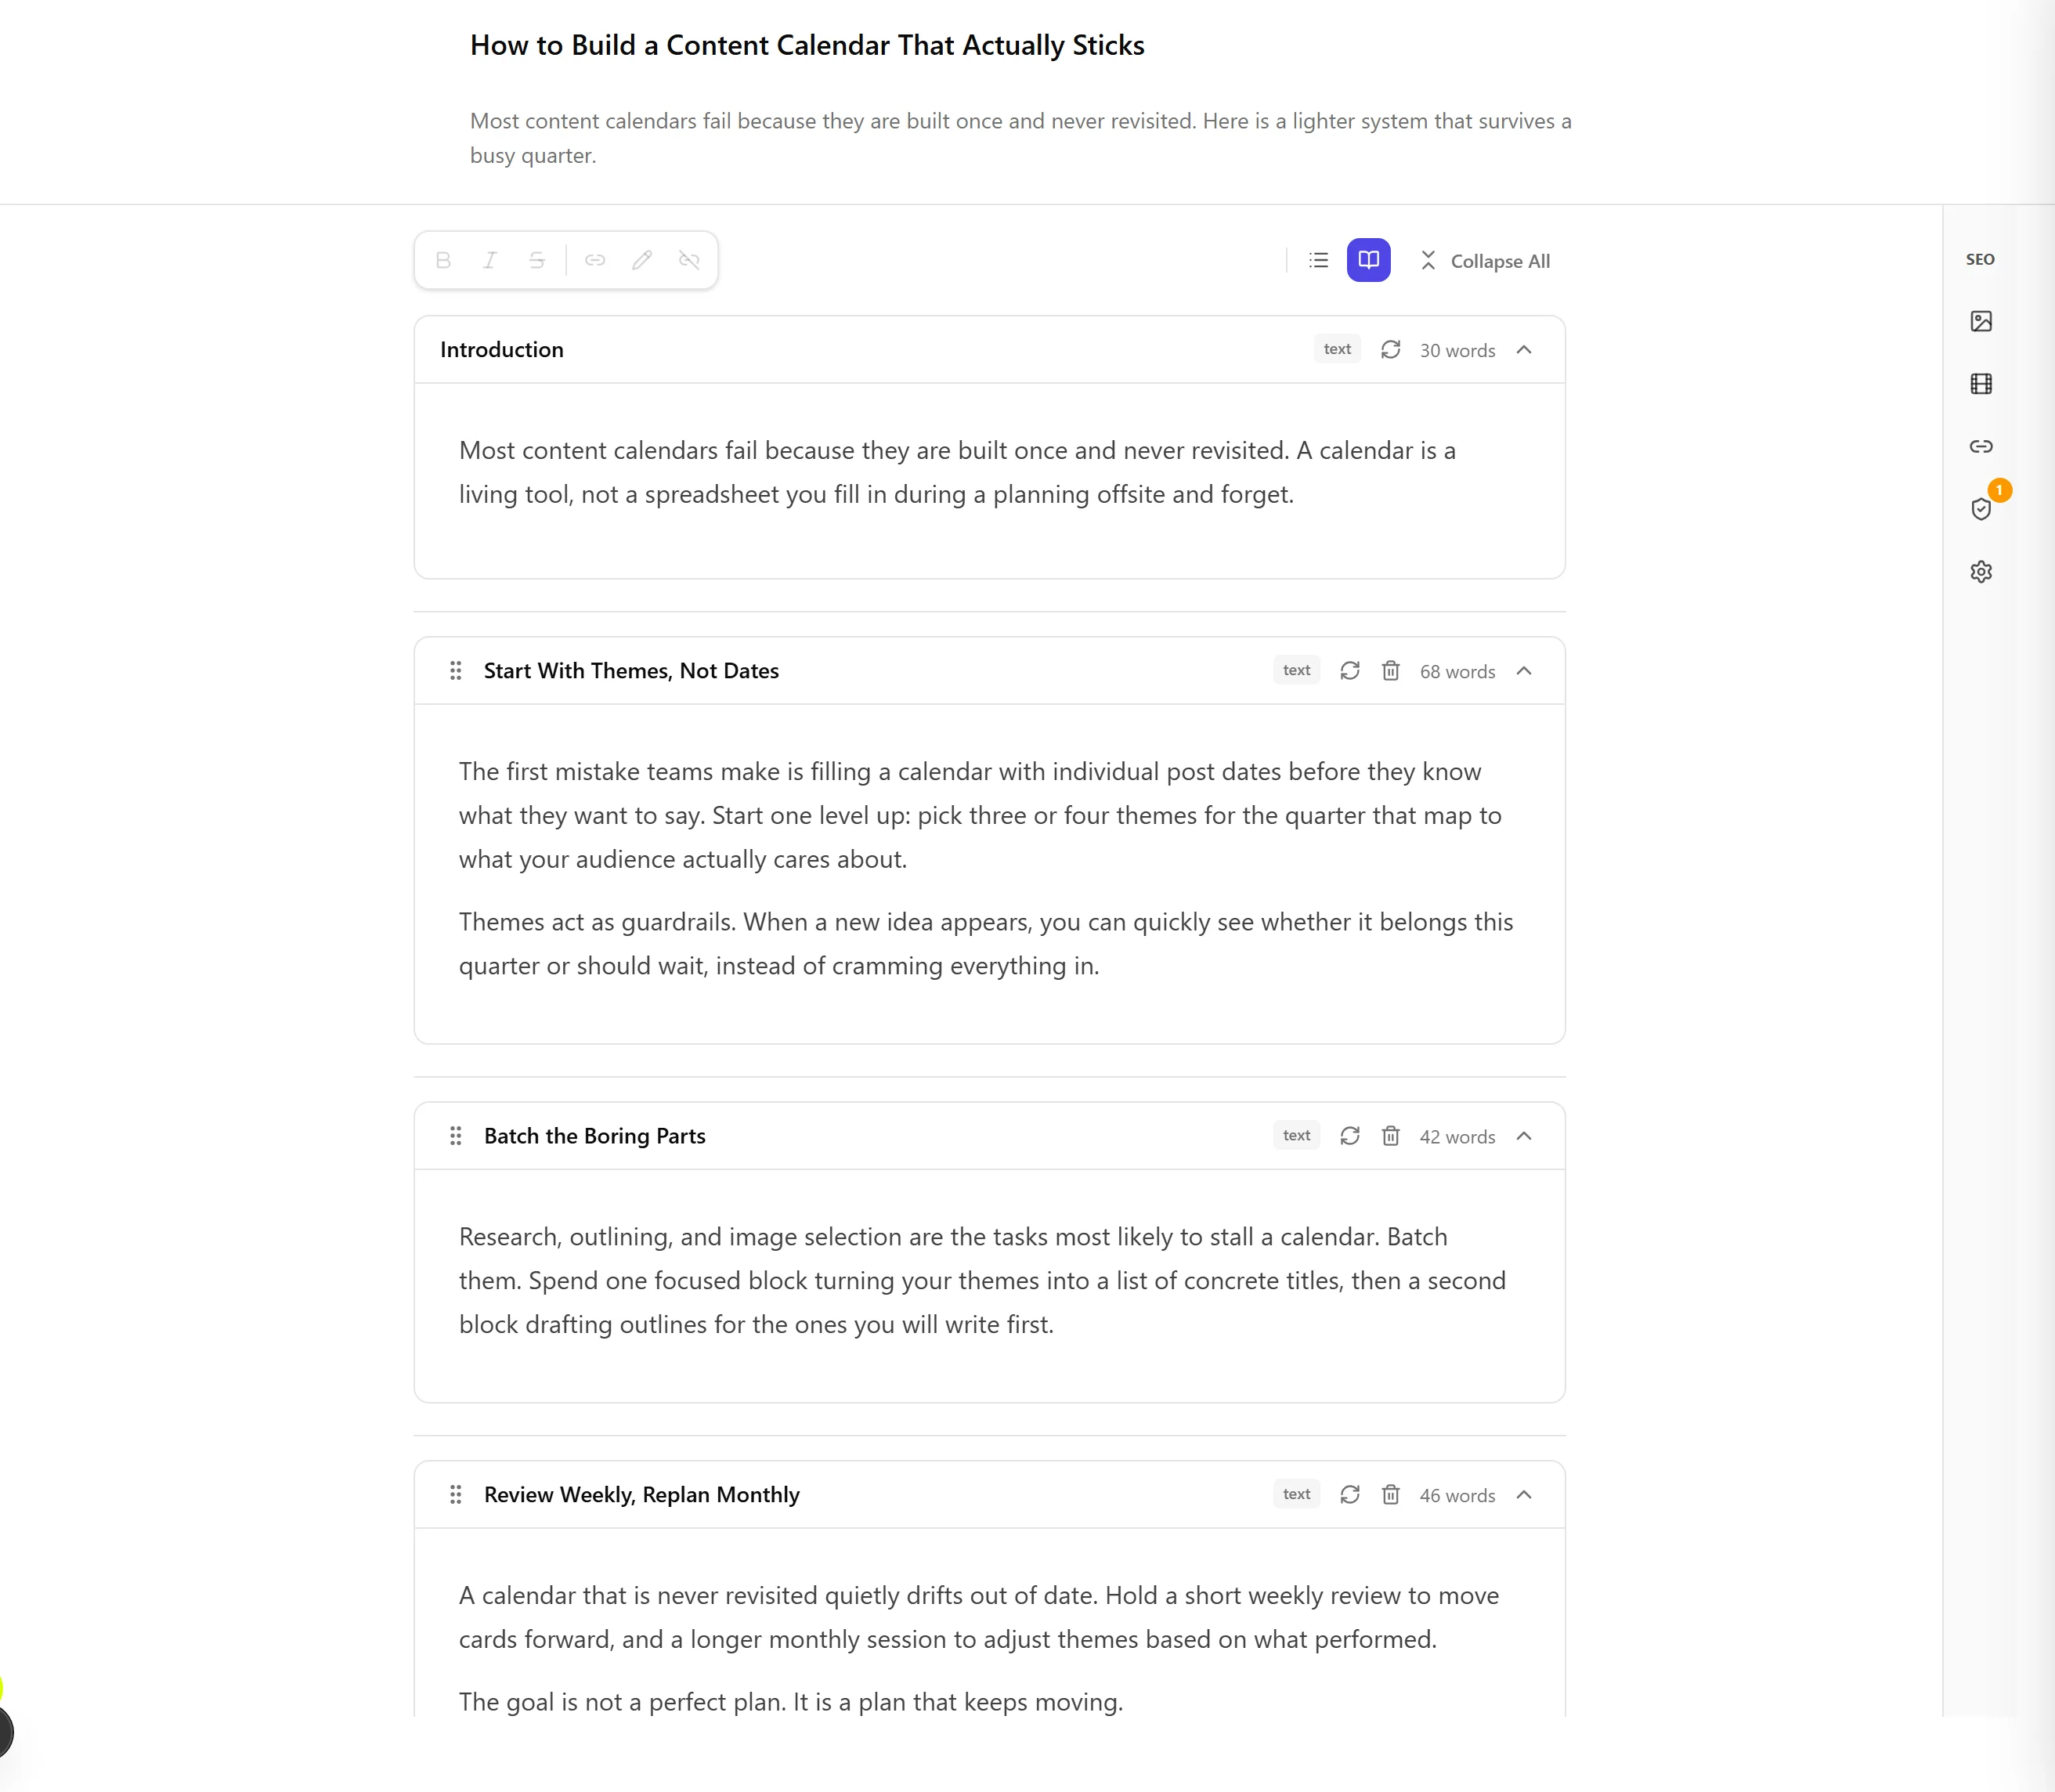
Your post is a stack of section cards. Each card holds one part of the article and can be edited independently.
- Edit text directly in any section. Formatting is handled by a floating toolbar that appears when you select text: bold, italic, strikethrough, bullet list, numbered list and link. The same controls sit in the bar at the top of the editor. A list you make here survives saving, reopening, exporting and publishing to your CMS.
- Reorder sections by dragging them into a new position.
- Add a new section anywhere in the stack, or remove one you do not want. Removing a section asks for confirmation first.
Regenerating a Single Section
Any section can be rewritten by the AI without touching the others. There are two modes:
- Restyle section rewrites the prose only and preserves all facts. Use it when the content is right but the wording needs work.
- Rewrite section allows structural changes and revalidates facts. Use it when the section needs a different angle or fresh substance.
When you give an instruction that can be measured, the editor tells you what happened instead of quietly handing back the text. If your focus keyword now appears in the first 100 words, you get a confirmation. If it still does not, or if it was there before the rewrite and is gone now, you get a warning that says so, with an Undo button that stays available for 30 seconds.
The Side Panels
A vertical icon rail sits on the right edge of the editor (on desktop). It opens five slide-in panels:
- SEO shows your live SEO score, target keywords, and the checks behind the score. See Understanding SEO scores for detail.
- Images manages the post's images: generate, regenerate, swap, and set the featured image.
- Video creates a video from the post using templates, music, and styles. See Creating videos.
- Internal Links suggests and inserts links to your other posts (covered below).
- Settings holds per-post overrides such as the sources and table-of-contents toggles.
Sources and Table of Contents
Two optional blocks can be shown or hidden per post from the editor toolbar:
- Sources lists the references gathered during research, split into research-grade and popular sources. The heading is editable, and the block hides itself when a post has no sources. A per-post toggle overrides your global default.
- Table of contents renders a preview of the post's headings. Its toggle appears once the post has live sections, and it is backed by your global blog setting.
The sources list
Click the pencil on the Sources block, or its heading, to open the list Nolorem builds while researching and writing a post.
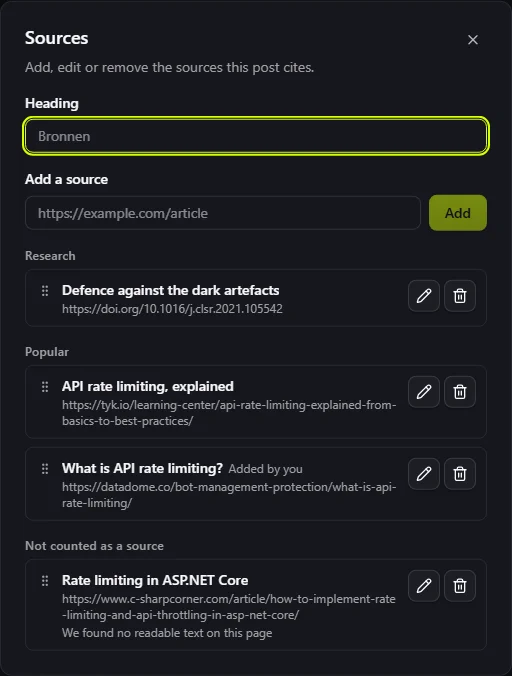
- Add a source by pasting its URL into the input at the top and clicking Add. Nolorem reads the page the same way it reads a source found during research, and shows the real title once it has. A page it could not read lands in its own Not counted as a source group instead, with the reason underneath: the site refused entry, the site could not be reached, it is not a web page, no readable text was found, or, for a PDF, no text layer, too large, this post's PDF reading budget already used, or it took too long.
- Edit a title or an address with the pencil on any row. The list is grouped by what the source is (Research, Popular, Not counted, or Your own documents), so an edited address can move a source into a different group.
- Delete a source with the trash icon. If anything in the post rests on it, you see that first: how many links in the text point there, any verified claim, and any open finding, before you confirm. Deleting a source a verified claim or an open finding rests on means the source check no longer describes the post, so it needs to run again before the post can publish; deleting a source nothing rests on does not.
- Reorder sources by dragging them within their own group, with the keyboard as well as the mouse. A source never moves between groups by dragging, only by changing its address.
- Your own documents keep their title and address in the media library, not here. A row for one shows where it points but is not itself editable from this list.
Right under the list, if the change leaves something worth checking, Nolorem offers to run the source check. It never runs on its own; you choose whether to run it now.
Internal Links
The Internal Links panel suggests places to link to your other posts, filtered by a minimum relevance threshold (0.70 by default, adjustable in your blog settings). Each suggestion shows a relevance bar so you can judge fit before inserting.
Links carry one of three states:
- Active links point at an already-published post and are live immediately.
- Deferred links point at a draft or scheduled post. They are stored now and activate automatically once the target post is published, so you never have to come back and wire them up.
- Anchorless suggestions could not find their anchor text in your content. You can use the AI "suggest sentence" workflow to add a natural place for the link.
You can also link selected text to another post or an external URL directly, and mute suggestions you do not want.
Publishing and Post Status
Status is read-only. You never pick it from a dropdown. Instead, the current status shows as a badge and you move the post forward with action buttons, so the status always reflects a real event.
The status values are Draft, Ready, Awaiting approval, Scheduled, and Published (plus the transient system states shown while a post is queued, generating, or after a failure).
The actions available depend on where the post is:
- Publish now or Schedule pushes the post to a connected destination. The split button is disabled until you have a valid destination, with a prompt to connect a CMS or create an API key.
- Mark as ready moves a draft to the Ready state so it is clearly cleared for publishing.
- Submit for review hands the post to a reviewer. Contributors who cannot publish directly use this as their primary action.
- Reopen or Back to draft walks a post back a step.
- Unpublish or Unschedule reverts a live post, with a confirmation dialog.
A lightweight planned date field is available on draft, ready, and pending-review posts. It records an intended date without scheduling a publish, so it works even before a CMS is connected.
Exporting a Post
The Export menu downloads the current post in four formats:
- Markdown with YAML frontmatter, delivered as a
.zipwhen the post has images. - HTML, styled and image-ready, also zipped when images are present.
- PDF, a real styled document generated server-side.
- JSON, a full-fidelity export of metadata, sections, and images for reuse elsewhere.
Export is a good way to hand a draft to someone outside Nolorem, archive a finished piece, or move content into another system.
Related articles
Was this article helpful?
Still need help?
Can't find what you're looking for? Open your support portal for live chat and tickets. Sign in with your Nolorem account.
Open support portal